Tuesday, April 23, 2019

Amidala's Headgear


Wire frame, not much bigger than a commercial hairband
Another story of things taking longer than planned.  The headgear is taking forever! I’ve been working on the wig & headpiece in 30-minute bursts for over a week.  Mostly it’s been about glue & paint drying but the learning process has been interesting.  I knew I needed to cover the headpiece with leather or vinyl, but I wasn’t sure how bulky it would need to be.  Getting it to curve right was the biggest challenge so I approached it like a hat—bend & wrap heavy gauge floral wire into the shape then cover it with buckram to stabilize the shape, then cover that with vinyl.  The leather I had was just too stiff to work into complex curves so I used the much lighter weight vinyl.  I fussed with floral wire a couple hours including the medallion shape, then excluding it.  Some of you will recognize the end shape—the Ah-HA moment was when I realized I was making a French hood with the frame turned backward.  I should have guessed that before I started, with all the online info about the designer’s inspiration being Tudor.
Laying on the wet buckram
Ready for leather
Once I had the frame made the buckram had to be wet & wrapped, then that dried overnight.  Then another layer because the thin vinyl showed the structure & I wanted it to look smooth.  By the time I’d put a couple layers of buckram on & let them dry, then glued on the vinyl, the weekend was over & the thing was much bulkier than I wanted. 
During the drying breaks, I used aviation snips to cut up the plastic baskets. The design was a great match but the plastic was so stiff that it was going to be awkward to work with & would take a lot of stitching or structure to keep in place, which would show. It needed to follow the curve of the head even with the headband & hair bag under it so I decided to try heat to slump it into more of a head shape. I did some experiments with the heat gun (too much heat at a focal point, also melted the styrofoam head) and in the end what worked best was to set the plastic pieces on a stainless steel bowl in the oven on a lower temp & pull out the bowl as soon as the plastic drooped, being careful not to disturb the plastic until it cooled. I did that a few times in stages so that the thinner pieces didn’t just melt into blobs. Then the pieces of plastic had to be painted, then sewn together, then painted a couple more coats mostly to hide the thread. The whole assembly was glued to black vinyl & when it dried the edges were trimmed. Then all that was glued to the headband.  Downside of the vinyl: it was backed with white fuzzy stuff, so you could see all the edges. I blacked those out with a sharpie.

Repurposing dollar store desk organizer baskets
Pretty darn close!


The dyed sweater was cut into 2 long slightly rounded rectangles with the inside one slightly smaller than the outside.  I sewed up the edges to make a bag then pinned it to the wig & cut the lower  bag opening  edges & stuffed curls in until it looked right. The outside piece being bigger hides the stitching.  I strung beads & sewed them into the wig backing. 

Now that I know what it looks like I’d probably build the assembly on a headband & use the kind of leather you can soak & mold, cut the band & medallion in one piece, soak & shape it like a mask, then spray it black. Getting the scale right was the tough part—I kept expecting the sides to be bigger. The little curve insets at the wide ends were about the width of a pencil.  It’s not as close to the original as I’d hoped for, but will pass the 10-foot rule nicely.  You can see I need some fine tuning to get the bag sewn into the wig at just the right spot, and to get the beads to stay on top of the hair, but it’s almost done. If I have time at the end I may iron out those front curls & fix the bangs.  The last step will be to glue on the blue beads for decoration (so they don’t come off in handling).
I failed to keep up with the time, but a good guess would be ~10 hours of actual work spread out over a week so far.
It doesn't look like it took a week!

Saturday, April 13, 2019

Petticoat Junction


I’m glad I had 8 weeks to do this because I’m down to 4 now & just getting into the hard part!

Before I can pattern the dress I need the undergarment. I’ve never had a quilted petticoat so I’m a little surprised at how HEAVY it turned out, but overall the effect is exactly what I wanted. I guess if you wear a blanket under your clothes it weighs what a blanket weighs (this took most of a twin bed comforter).  It definitely pulls on the shoulders. 


The fully lined petticoat is 2 layers of lightweight cotton and the skirt has an inner layer of cotton batting that stops just above the natural waist. I used the top of an old quilt for the inside and printer's cotton for the outside.  The batting smooths out the hoop lines so the dress won’t show them.  The hoop casings are on the inside layer & made of lightweight cotton waistband interfacing. I wrapped double fold bias tape over the  bottom to give the edge extra stiffness. I didn’t have enough spring steel for 4 hoops so I made the bottom one out of some salvage nylon cable stiffener I’d been saving for a corset experiment. That stitching about 2" from the bottom is to keep the 3 layers of skirt lined up.  


Inside casings
Hem casing


Time spent on the petticoat: 14 hours including pattern, cutting, fitting, sewing & a quick trip to JoAnn's for bias tape. That's more than I expected but I'm out of practice.


1/2" Spring steel is good for hoops. It comes in different weights & it can be cut with aviation shears or tin snippers.  The ends are sharp & need to have the corners ground off.  I dip them so they don't snag on the fabric.  Tool dip is easy to use, cheaper than the stuff they sell "just for corsetry" & even comes in a spray version.
Hoopskirt tools

1/2" Spring steel after grinding. Then I dip the tips so they don't snag on the fabric.

Random nylon stuff for lightweight boning

A Good Day to Dye


I have ~3 yards of abstract textured velvet, and it’s supposed to be linen & cotton, which means I should be able to dye it.  The backing needs to be peacock blue & the pile needs to be a coppery brown.  Dye tests on a swatch were promising and it’s the only thing I found in local fabric stores that had a good texture and at least a usable color. 3 yards isn’t enough for all the coat panels, but I’m hoping to piece the lower ones so they look like whole panels.  Meanwhile I’m keeping an eye out for other options. 

The fabric was machine washed in hot water and dried multiple times to remove any finish & soften up the fibers.  I did this over a few days so it would be ready when I got a dry day to work outside.  I don’t want to get dye all over the bathroom, instead I’ll roll out plastic on the patio & paint the dye on, then let the fabric sit in the excess liquid.  I can roll that up & rinse in the laundry sink before doing final rinses in the washing machine and hopefully keep the dye out of the house.

Finally got that dry sunny day so…

I need to dye the cotton sweater to make the snood, as well as the velvet.  Both need the coppery brown.  The velvet needs the peacock backing done first, then the brown pile.
Chemistry lab

Using cotton ball for color check

Stirring the dye
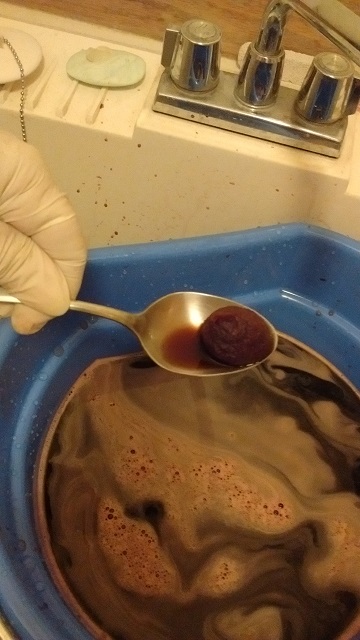
I decided to vat dye the sweater, so I mixed up Procyon with salt & soda ash in a bucket.  I have a range of dye powders so I did a pinch of this & that until the color was what I wanted. Vat dyeing needs constant stirring or it will streak. I wanted the color to be uneven, so I didn’t stir it much.  I left the sweater in the bucket about 4 hours, then rinsed it & hung it to dry.  I wanted it darker so I put it back in for another couple hours, rinsed & dried again.  The peach sweater is now a rich textured brown. 


Brown-after
Peach-before


I rolled out plastic on the garage floor & rolled up the doors. It was sunny out but windy, so working inside seemed like a better idea than the patio.  I put the fabric back-side to the floor because I wanted to keep the blue out of the pile as much as possible.  I mixed up the dyes in buckets, folded the fabric in half longways & brushed on the blue dye one half at a time with a big nylon brush. Once the fabric was saturated I put it back-side down to soak in the drippings.  After a couple hours the blue looked nice & dark & the fabric was only damp, so I flipped the fabric over & did the same thing to the pile side with brown.  I wasn’t worried about the colors bleeding into each other, that would make it more interesting. 
Ready to paint on dye

First half of peacock blue 

Viewed in the sun, the pile didn’t seem to be taking on the color very well. There’s a silvery-gray sheen to it.  I painted layer over layer until I ran out of brown dye but it seemed like the dye wasn’t changing the pile color much at all.  Then when I rinsed, both colors rinsed out more than I wanted them to.  O well, that’s the breaks.  Just I case, I pulled out a can of brown spray-on upholstery color & sprayed some on.  It makes the fabric stiffer, but it doesn’t wash out.  I’m still open to better options, but I have a day tied up in “making” the coat fabric now (and I don’t know yet if I have enough to fake the parts I need because I haven’t created the pattern).
Velvet before

Velvet after

Finished piece in the sun with the taffeta. Cotton rag picked up that much brown from wiping my gloves, velvet should be the same color!

Amidala's Brooch


You know how every project takes on a life of its own & grows into something daunting? I thought I’d start with the brooch. It’s a little thing & seemed easy to create. I printed out different sized pictures, rolled out Sculpey on wax paper, cut out the shapes like a batch of cookies, and tried to transfer the design.  I tried pressing it in with various tools, drawing on the clay freehand, punching outlines with pins, I even baked the photo onto the Sculpey but I wasn’t happy with any of it.  The design was too small to do well in the soft clay. I had some other ideas including using the Dremel to clean it up after baking & printing it really large on shrinky-dink plastic, cutting it out, then shrinking it down & gluing on a clay cookie and making a casting mold from that.  I kept wishing I knew how to model for 3D printing. Most of an afternoon later I decided to put it aside & work on something else.  Honestly, for a costume I could have glued the picture on a clay slab & that would be plenty.  That doesn’t satisfy my obsession with details.

Using pin to poke in the design through picture

What it looks like after the paper is peeled off

Some of the better results, printed photo is the far right--YUCK!

2 weeks later I was surfing for close-up photos of the dress sleeve & stumbled on a blog that talked about a woman who 3D printed Amidala accessories, which led me to a website that 3D prints cosplay parts.  Sigh. Here’s the printed one before & after I sprayed it with metallic paint I had in the garage & thank you Shapeways. It cost about the same as 2 blocks of Sculpey.  Bottom line, if I’d thought to look for 3D printing first I’d have saved a day of frustration. That’s the way this hobby works—there are so many directions you can go to solve the same problem, and it’s all up to interpretation anyway.


Raw plastic brooch & pin
Finished plastic brooch. Not quite the right color, but it's the paint I had


Sunday, February 24, 2019

Amidala’s Peacock Dress from Star Wars Episode III

My company is going to have a costume contest for Star Wars day and I’ve been blabla at everyone for years about how I costume for a hobby but nobody’s seen me do anything.  After all, I’m not wearing historical garb to work. I decided I needed to do something geek-worthy. I was hoping I could pick something that could be at least partly re-used for another event on the same timeline and maybe even get a 3rd use at a con.

------------------------------------------------
Goal: Make a recognizable Star Wars costume

                --Need to be able to drive in it & work in it

                --no handheld props

Deadline: Wear it on May 6, 2019

Budget: Lets see where it goes but it would be great to stay under $100.

Addl considerations: Use as much owned material as possible.  Track time spent.
-----------------------------------------------

Week 1:

Research ~6 hours

+ Movie watching all weekend

I haven’t seen the older Star Wars films in years so step 1 was to Google for Star Wars costumes & step 2 was to watch the entire series to get into the mood & also see how the costumes I favored worked in motion.  That warranted a trip to the library to get all the episodes at once, as well as all the picture books I could. I really like Renaissance inspired shapes & I’m already familiar with the patterning & have functional support garments so I picked out 2 of Amidala’s court dresses that had Ren shapes & her velvet security detail uniform as an easy backup option.


1st choice was a gold moire’ gown with blue velvet coat that has a very interesting collar.  I already have a similar outfit in my SCA wardrobe in the right colors & fabrics so this seemed like an easy recycle.

 2nd choice was the peacock dress because I have yardage of the right color shot blue taffeta and I love the hair.  It also looked like something I could re-use easily.

3rd choice the copper velvet security uniform because it looks easy & would be something I could get a decent amount of re-use out of with minimal time invested.  
---------------------------------
I couldn’t find either dress in the films.  Uh-Oh.  More Googling.  Dress 1 never made it into the film, and dress 2’s scene got cut despite it was in all the pre-release publicity, even to the point that Simplicity released a pattern. I found 2 websites with excellent information including the design notes and the only photos I was able to locate of dress details. I have enough info now to do a decent copy, so I’m going to go for #2. It’s a blessing and a curse to find photos of swatches because you find out all the detail the photo & long camera shots didn’t give you. Also, the design notes tell me that the photos pixeled out some important fabric details. This is going to be more work than I originally hoped for because there is SMOCKING.  I picked up a smocking machine at an estate sale last year & this will be a chance to try it.  Also, except for the designer’s basic description, we don’t know what the dress looks like, because it’s always under a coat. The Simplicity pattern doesn’t follow the designer’s description (I was able to see the line drawings & layout in someone’s Amazon ad, $60 ouch) so the pattern can be disregarded. I’m starting from scratch.

Week 2: Create materials list, sourcing, map out the project

2/17-20 Made & fine tuned a list of all the things I think I’ll need based on design details & past experience.  ** Making the BOM & decide on dress design 4+ hr
2/21 PM Unearthed all the owned things from my studio so I know what’s on the shopping list.  The 2 most important items I don’t have are patterned velvet for the coat, and the wig.

** Finding all the owned stuff ~2 hr
2/22 Shopping day (woo-hoo!) A somewhat local wig shop (McMinnville) had a reasonable wig on their website so I made a trek there to see what it really looked like. Excellent find & clearance priced.

The clearance fabrics section of the local JoAnn yielded an interesting patterned velvet, not swirly like the original but random enough for a copy and it’s linen-cotton so I should be able to dye it to the right colors. 

I found a cotton sweater at goodwill that mimics the texture of the snood.  Another dye project.  I’ll also need to dye the canvas I’m using for the coat edging.

I had black leather to use for the headpiece but it was pretty stiff so I got some synthetic at JoAnn which might work better, just in case.

Lucky accident at the dollar store, the Easter baskets they were unpacking have a remarkable resemblance to the pattern of the top of the headpiece.  Bought a few of those.

Also bought pin backs for the brooch and an assortment of cheap kids’ pony beads that included some browns.  I have beads but I didn’t have quite what I thought would work. It would be easy enough to paint over what I have to save $ but for 5 bucks I don’t need to mess with painting.  
**Shopping 9 hr (This went well & I’m feeling lucky!  I have everything I need in the first round. That NEVER happens.)

NOTE: Photos of the actual film dress are not mine, they were printed out from other blogs and may be copyrighted by Lucasfilms.  To see better versions, more info, and citations go to these sites:


----------------------------------------------

I Have A Plan (not necessary to execute in this order)

Dye Velvet & Other Textiles

Make Brooch
I decided to reproduce the brooch using Sculpey clay, since I had packs in blue, black & bronze.  I needed to buy the pin back. I considered baking loops into the back & sewing on, but some photos of the coat show it without the brooch.  I should be able to cut the design into the clay using carving tools & a printout of the brooch design.  From photos of the outfit I estimate it’s about 1.5 inches across.  I’ve printed out photos in multiple sizes so I can cut them out & see what looks best. Other methods to reproduce would be to cast in plaster, carve out of soap or wood, paint pretty much anything, or 3-D print it.


Make Headpiece

I’m planning to make a frame from heavy floral wire & cover it with buckram, then glue the black materials to it.  The baskets I got will need to be cut up & painted to a bronzy-metallic.  I should be able to sew them on top of the black headpiece & glue the blue beads on.

Make Snood

I didn’t find any good closeups of this.  It appears to be a beaded bag, probably made from a beaded scarf with quite a bit of texture.  I liked the look of lightweight boucle’ knits but only found them in synthetics, which don’t dye well. I got a reasonably similar texture in a knitted cotton sweater.  If there is excess time I can add beads later but that is a time-consuming detail that I’m not concerned about.

Add Beads & Snood to Wig

I have gold springs to mimic the metallic beads & brown pony beads. Should be able to pull the curls through the beads with a fine crochet hook, or wrap the tips of the hair in foil & thread them on like a shoelace. Past experience with beads in my own hair says I might need to glue them to hold in place.

Make Hooped Underdress
I have multiple sets of hoops but taffeta is lightweight & likely to show hoop lines unless I wear layers of petticoats. The original dress is Fortuny-pleated and has very crisp vertical lines.  I’m not pleating the skirt so any understructure will show.  The original design called for a quilted, hooped petticoat & there are online photos showing it’s Empire-style.  I’m electing to make a new one that works with the fabric since I don’t have one that type. The quilting will give the dress some real support without sagging between the hoops. I have a garage sale comforter that I tore apart, and it seems to be all cotton. I’ll put the color to the inside (it’s pink) and do the face surface in white cotton. That will make it re-usable for other historical costumes.

Make Dress

The big trick here is the smocking. Yoked turtleneck, Empire waist, A-line skirt, bishop sleeves, long Victorian cuffs with dangly bead trim, double row of beads top of collar. If it was cotton it could be Gunne Sax. The design notes say yoke is smocked, front is smooth. Photos show smocked cuffs, Fortuny pleat sleeves. You can’t see the sleeves above the elbow. You can’t tell from the photos that the neck is smocked because the pixel-expansion makes it soft, but once you know what you’re looking for the indicators are there. No idea what shape the yoke is BUT there don’t appear to be any seams above the coat closure…I think the designer visualized the dress as a blend of a period gown plus chemise.  That’s close enough to the shapes of Simplicity 8735 that I can use it as a starting point. I’m going to put a zip in the back & line the bodice & cuffs so I can support the smocking & also to protect the fabric & give it some weight. 

Make Coat

Once the velvet is dyed this is a couple lined layers with made edge piping (there was a swatch, heavy grain like canvas, unclear what color because it appears blue in some photos, gold in others, and mostly disappears in the distance shots). There are beaded tassels on the points, not sure yet how I’ll handle that but I have small black tassels & could also do them in yarn or possibly beads, or leave them off entirely.  The lining swatch for the original is copper taffeta.  I have plenty of black suit lining so I’m using that.  The real coat has all the edges decorated with couched cording.  I’m not even going to try & duplicate that.  It’s a year’s worth of handwork.  If I had an embroidery machine, maybe, but you can’t see it at all in the distance shots.  A lot of work just for the HD camera in case of a single close-up.  My biggest concern is there might not be enough velvet.  I got all there was, so I’ll have to pattern to fit the fabric.


Shoes?? Stockings??

The design notes call for brown court shoes (unseamed pumps) 1.5” heel & knee-high nylons, so it’s apparent they never expected the feet to really show.  I have a pair of brown buckle shoes & a pair of dyeables pumps that could be made brown.  Also a pair of satin beaded ones in a bright peachy color that are the perfect shoe but wrong color, possibly dyeable. 

-------------------------------------------------------

Dye Tests

The fabric content of the velvet is SUPPOSED to be linen & cotton but I never trust bolt labels on clearance stuff. Dye test looks like I can get the look I want.  The backing needs to pick up some blue color & the pile needs to be dark coppery brown.  I painted dry dye powder teal & peacock onto the back of a scrap saturated with dissolved soda ash, let it sit a couple hours & washed it out, then dried it.  Once it was dry I soaked it in soda ash again, sprinkled some brown on the velvet side, let it sit for a few minutes & washed it out.  The pile is more resistant to coloring but it did pick up some color in the short time there was dye on it.  I think by laying the fabric out flat dye side down & doing it in 2 stages I can minimize bleeding between the colors. I’ve never dyed big pieces without a ceramic bathtub and a spray to rinse with, but my new house has fiberglass baths that I don’t want stained.  My great idea is to put plastic all over the garage floor & flat dye 3.5 yards on the floor.  I don’t want to soak it so that the pile takes the blue dye so I’ll paint on the colors with a brush or sponge and trust gravity to keep it from wicking up too much.  An interesting experiment at least.
Fiber Reactive Dyes

Velvet Dye Test Back

Velvet Dye Test Front

Getting Started Again (At Last?)

Does it seem like I'm always worrying over not getting started and not getting done? Really, this time I've been on hiatus entirely too long (Years not weeks)!  My SCA friends would say I've been "having life" for a bit.  I lost my dad, sold my house, moved to the 'burbs and have been trying to recapture the creative person vibe that doesn't seem to manifest in a family neighborhood the way it does in the inner city. Settling in has taken too long, my studio space is mostly unused because the light desperately needs augmentation and I'm not in the mood to do any upgrades to this new house. I've lost too many friends in the last few years as we all age & life catches up to us. Making fancy clothes seems like such a trivial way to spend precious time when you've watched someone struggle with chemo, or held their grieving child. But we all need art to feed our souls & this is my art. My soul has been left hungry too long.

It’s been a few years since I made anything, so I’m going try & blog properly for the couple folks who asked me to & any others who might be curious about the process.  I HOPE that will be enough motivation to make me actually finish the project.  Here goes…

Why Cosplay?

When I started this blog, I had the idea that it would track my work on historical costuming documenting how I learned & applied what I learned to create useful and sometimes splendid garb. I thought it would be helpful to those folks who were always asking me at events how to do things. There are hundreds of professional caliber blogs out there now that provide every level of instruction & detail, and I don't feel compelled to compete with those, so I'm not entirely sure what I should be blogging instead. My thoughts? In a Facebook-driven world it seems redundant but I'll start there.


I learned in school that there are two kinds of garments: clothing and costumes. Clothing is what people really wore/wear and costumes are something else entirely. Any distinctions are increasingly less obvious, and the concept of living and playing in non-mainstream clothing has itself become mainstream. I'm going to try & restructure this blog to have HA things and Cosplay things on separate branches and make it more intuitive for my handful of followers to navigate. I'm still learning how blog tools work & I don't want to delete the old posts & just start over, so please indulge me while I meander through making it happen.
In 1982 I started gathering data for what would become my grad paper, a timeline of how Hollywood influenced the ready-to-wear industry.  Before mass-media, fashion was the jurisdiction of wealth & royalty. Silhouette changes trickled down slowly from the courts of Europe & Asia to people in cities and eventually the countryside. Money could buy cloth and notions, but until sewing machines became a household item nice garments were still custom handwork.  Mass media brought fashion into the average person’s life and with that access came the desire to dress.  Women scanned the social columns of major newspapers to discover clues about fashionable wedding gowns and trendsetting accessories. Printed sources like Godey’s and the Sears catalog, and later movies and TV, gave average people a look at what others were wearing, and what was cutting edge.  People find status in dressing like their heroes, whether they be socialites, politicians, movie stars or fantasy characters.  Movie studios realized this early on & built partnerships with clothing designers & manufacturers, providing their stars as models to sell clothes.  Some of the most successful ready-to-wear garments have been driven by that public hunger.  Reproductions of Scarlett’s GWTW wedding dress, the leather jackets of Jon BonJovi and Michael Jackson, kids’ Underoos sporting images of ninja turtles are but a few examples of wildly successful media-driven fashion. For many people, their first exposure to historical or imaginative dress came from a movie.  
In 1982, if you wanted to copy a garment in a Renaissance painting your main resource was the public library. If you were lucky enough to travel to or live in a city with a museum, you might get to see your source painting close-up, or if you were very lucky you might get to see an extant garment similar to what you were working on.  If your primary source was a movie costume, you had similar limits.  You could watch the movie, IF it were playing in your local theater. You might see it on TV if it wasn't a new release. Traveling exhibits & private collections, the occasional press still, these were the gold standard to beg access to if you wanted to make something recognizable. Theater departments all over the world re-created the wheel [farthingale] with every production of Shakespeare.  Information sharing was difficult and primarily confined to academics.

In 1982, you probably had to create your own pattern, so a costumer needed to know how. This required a working knowledge of geometry, draping, textiles & anatomy.

In 1982, building accurate reproductions required substantial personal research. If you didn’t work in theater, you might not ever meet anyone who could tell you much about it.

In 1982, the fabrics you had access to were limited to what your local fabric store carried or what you brought home if you traveled.  You might strive for authenticity but it was a stretch goal. The creation of lycra/spandex and other petrochemical textiles completely changed how garments fit and how they were manufactured. Qiana anyone?

In 1982, fewer people were sewing at home, and home-ec programs were downtrending as women graduated high school & went right into the workforce, unlike any generation before them. Complex garments require complex tailoring skills, which were being lost because they were no longer needed to create the modern easy-care wardrobe.

In 1982, costume props/wigs/theatrical appliances weren’t something you could purchase from your local department store. Wig and model makers were highly skilled professionals.
In 1982, playing dress-ups was for children, theater, Carnivale and Halloween.

About 1999 I interviewed for a novel position—A major retailer wanted to see if selling costumes to the general public was a money opportunity. They had tested a few pop-up costume stores in major cities with positive results the previous Halloween, and were going to open seasonal Halloween shops across the US.  Costuming as a mass market retail industry had begun. The popularity of video gaming has contributed to erasing the line between how children play & how adults play. Manifesting copies of your heroes’ Erte’-esque costumes has become a competitive (and arguably necessary) art form.


--The internet has made a wider range of materials accessible and affordable.

--The internet has made information about garments more accessible.

--The internet has brought people together with similar interests & given them forums for sharing ideas and a display venue to share their work despite physical distances & language barriers, all while sitting in their own homes.

--Online gaming fuels a need to bring virtual characters into the real world to give them dimension.

--Pop culture trends have always included a fashion aspect. The widespread incorporation of art movements like steampunk into everyday dress underlines how fashion is a tool that can cross boundaries like nothing else.
--Learning history by dressing it & doing it aids in comprehension. Reenactment also preserves skills we are losing as we become a computer-driven society.

--Taken together, these elements have supported the rise in convention culture (“Cons”).

-- As a culture, we work long hours & we no longer dress for dinner, for church, for nights out. Dress codes aren’t part of most lives. Most of us live in a world without glamour, and the only fantasy we’re likely to see materialize is a good parking spot. We need a break. Dressing up gives us a break from the ordinary.  It lets us temporarily see ourselves as something more than exhausted worker bees shuttling the kids between activities while picking up takeout meals. Dressing up lets us be superheroes.

-- The sustainability movement of recent years has brought renewed interest in sewing and recycling old garments. When you aren’t dependent on the current retail trend you can wear anything.  Why not wear what you want? Bonus points if it looks like you stole it from Mad Max.

--Kids love to dress up. Want to bond with your kids?  Play with them.

--Costuming is a multidimensional art. People should share their art.  Now they can.
Welcome to Cosplay